Connecting Your EKS Cluster to Stackbooster #
To start optimizing your AWS EKS cluster with Stackbooster, follow a guided process that ensures safe integration, gradual transition, and full control over automation. Depending on your goals, you can begin in read-only (RO) mode for safe evaluation, and later switch to full autoscaling and cost optimization by upgrading to read-write (RW) mode.
Step 1: Connect Your AWS Account #
Before connecting your EKS cluster, you must connect your AWS account to Stackbooster. This can be done in two ways depending on your experience level with the platform:
You can choose between:
- Read-Only (RO) Mode – Evaluate optimization opportunities without any risk. No scaling or infrastructure changes are performed. If you’re new to Stackbooster, you will be guided through connecting an AWS account during the initial sign-up wizard... Here, you can connect your AWS account in read-only (RO) mode or choose Read-Write Mode
- Read-Write (RW) Mode – Full integration that enables automated scaling, defragmentation, and node optimization.
Detailed connection instructions are available in our AWS account integration guide.
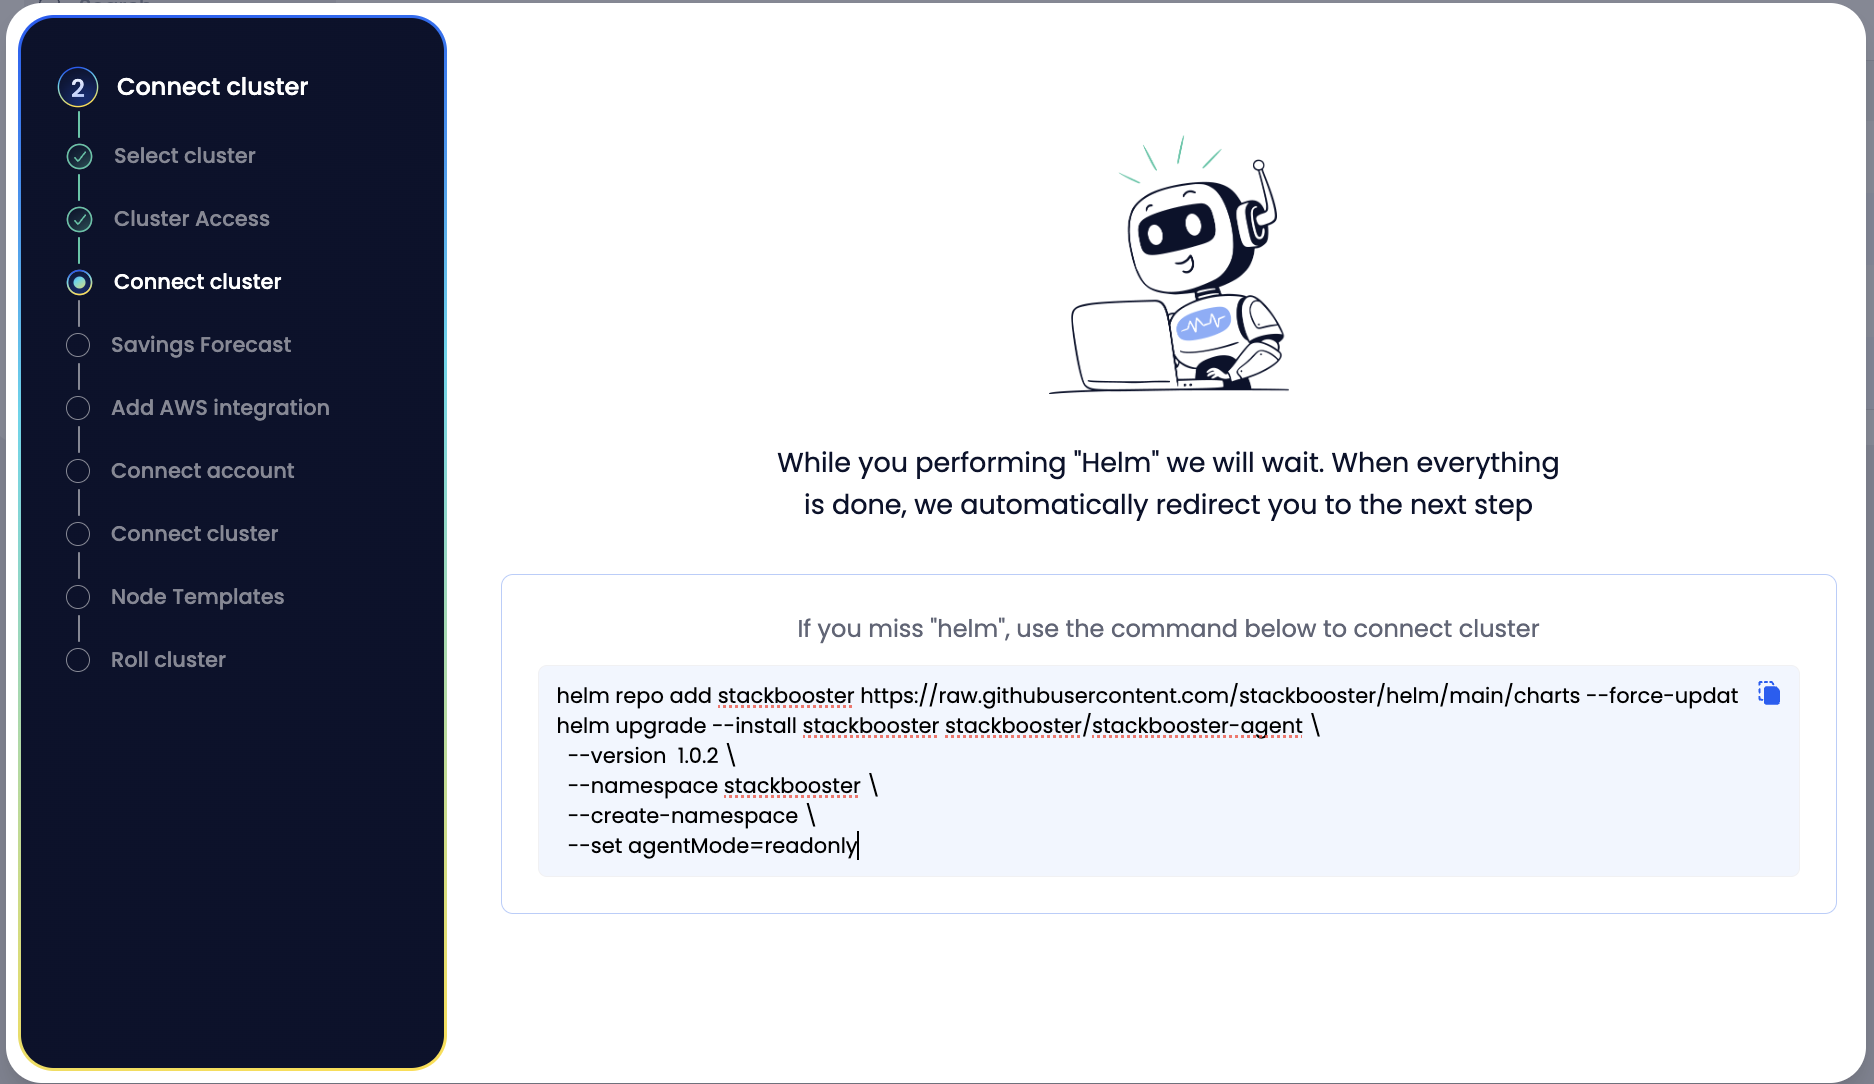
Step 2: Install the Stackbooster Agent on the Cluster #
Next, deploy the Stackbooster agent into your EKS cluster. The Stackbooster agent is distributed as a Helm chart that runs within your Kubernetes cluster.
Ensure your AWS CLI is configured and update your kubeconfig for the EKS cluster (for example, by running aws eks update-kubeconfig –name –region ). Verify you can access the cluster with kubectl get nodes.
If connected in RO mode, the agent is deployed in read-only mode, which means:
- No infrastructure modifications will be performed.
- The agent collects data needed to evaluate cost and performance optimizations.
- The required permissions for this mode are outlined here.
If connected in RW mode, the agent is installed with full capabilities.
It will be ready to apply optimizations, but actual changes to cluster infrastructure will only begin after you transition the cluster via a roll process to Stackbooster-managed nodes.
 #
#
Step 3: Transitioning to Stackbooster Management #
To begin applying Stackbooster optimization and autoscaling:
Upgrade the Stackbooster Agent to RW mode (if originally installed in RO mode).
You will be guided to run a Helm upgrade command in the UI to enable full management functionality.Configure Stackbooster Node Templates.
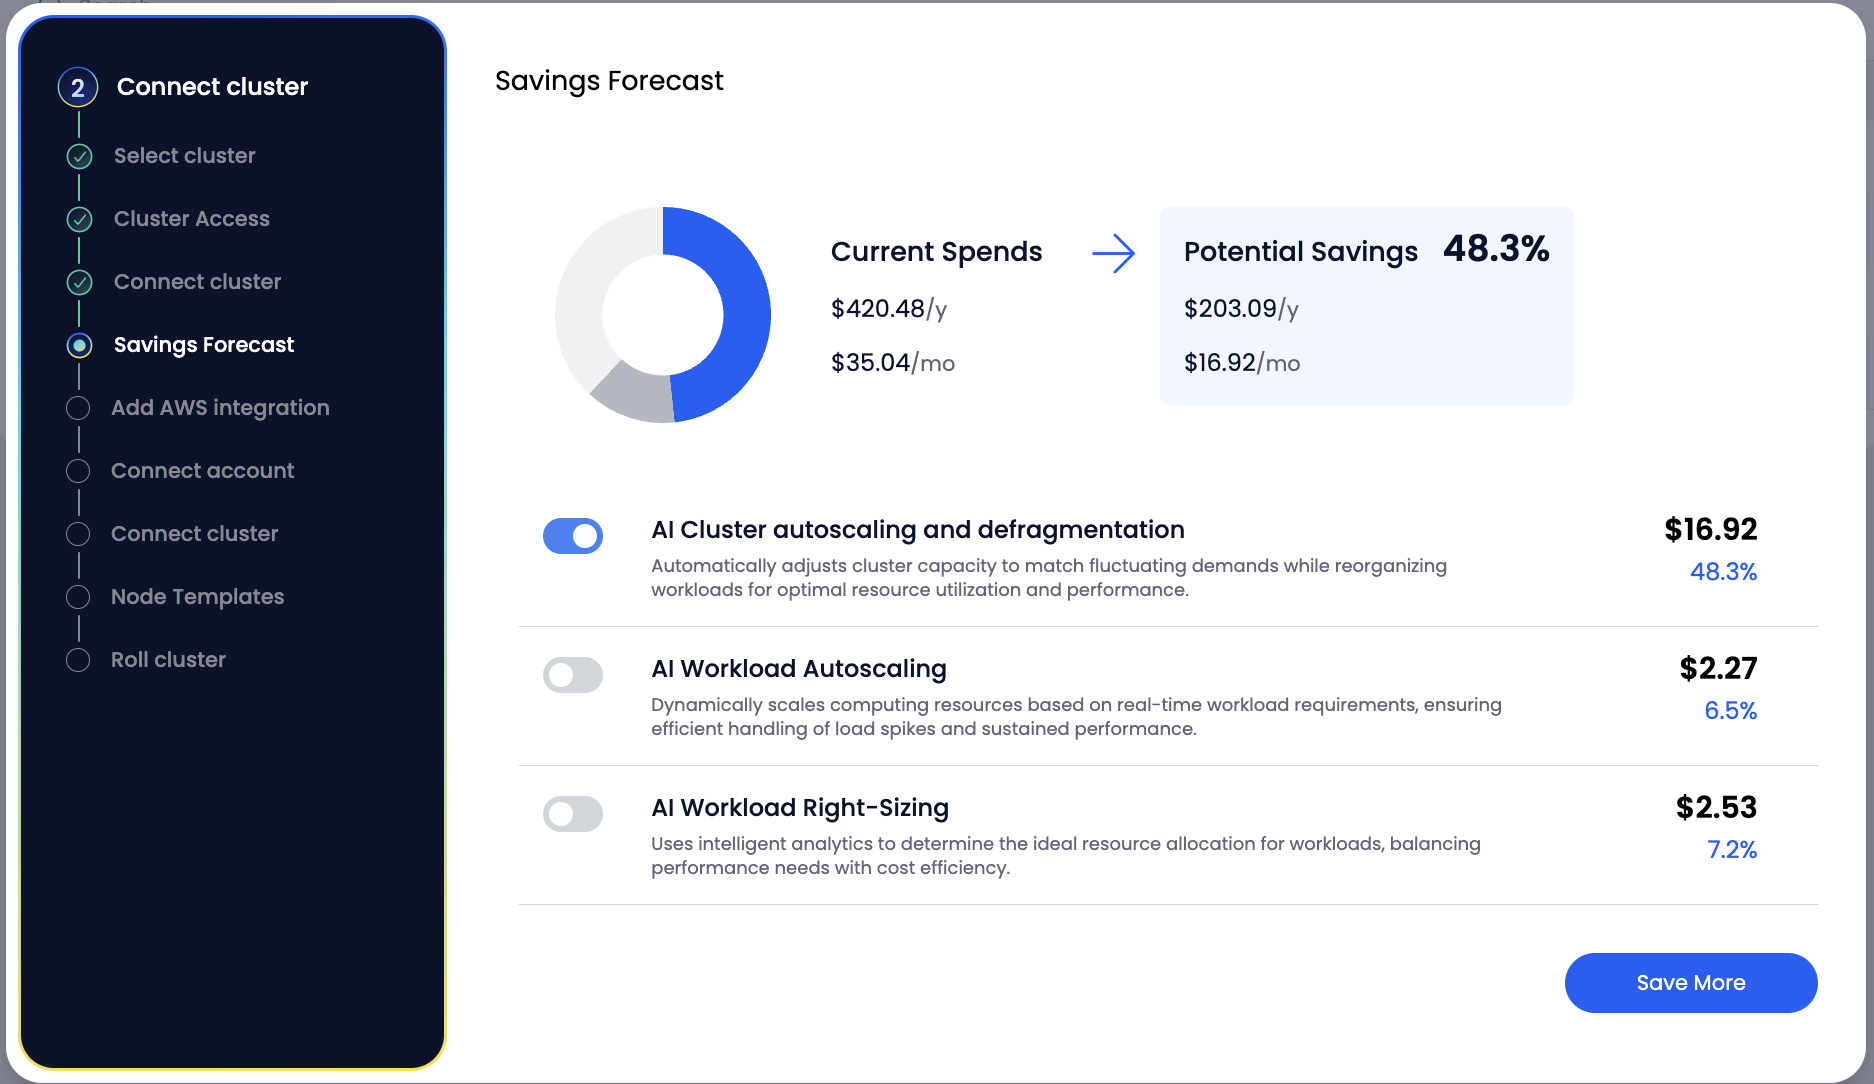
These define the instance types and constraints Stackbooster uses for provisioning nodes.
- A validation check ensures every running application matches at least one Node Template.
- If mismatches are detected, the system will block further steps until resolved.
- Documentation: Node Template Configuration
- Initiate the Cluster Roll.
This will gradually replace unmanaged nodes with new nodes launched according to the configured Node Templates.
Once the roll completes, your cluster will be fully managed by Stackbooster and all optimization and autoscaling capabilities will be active.
 #
#
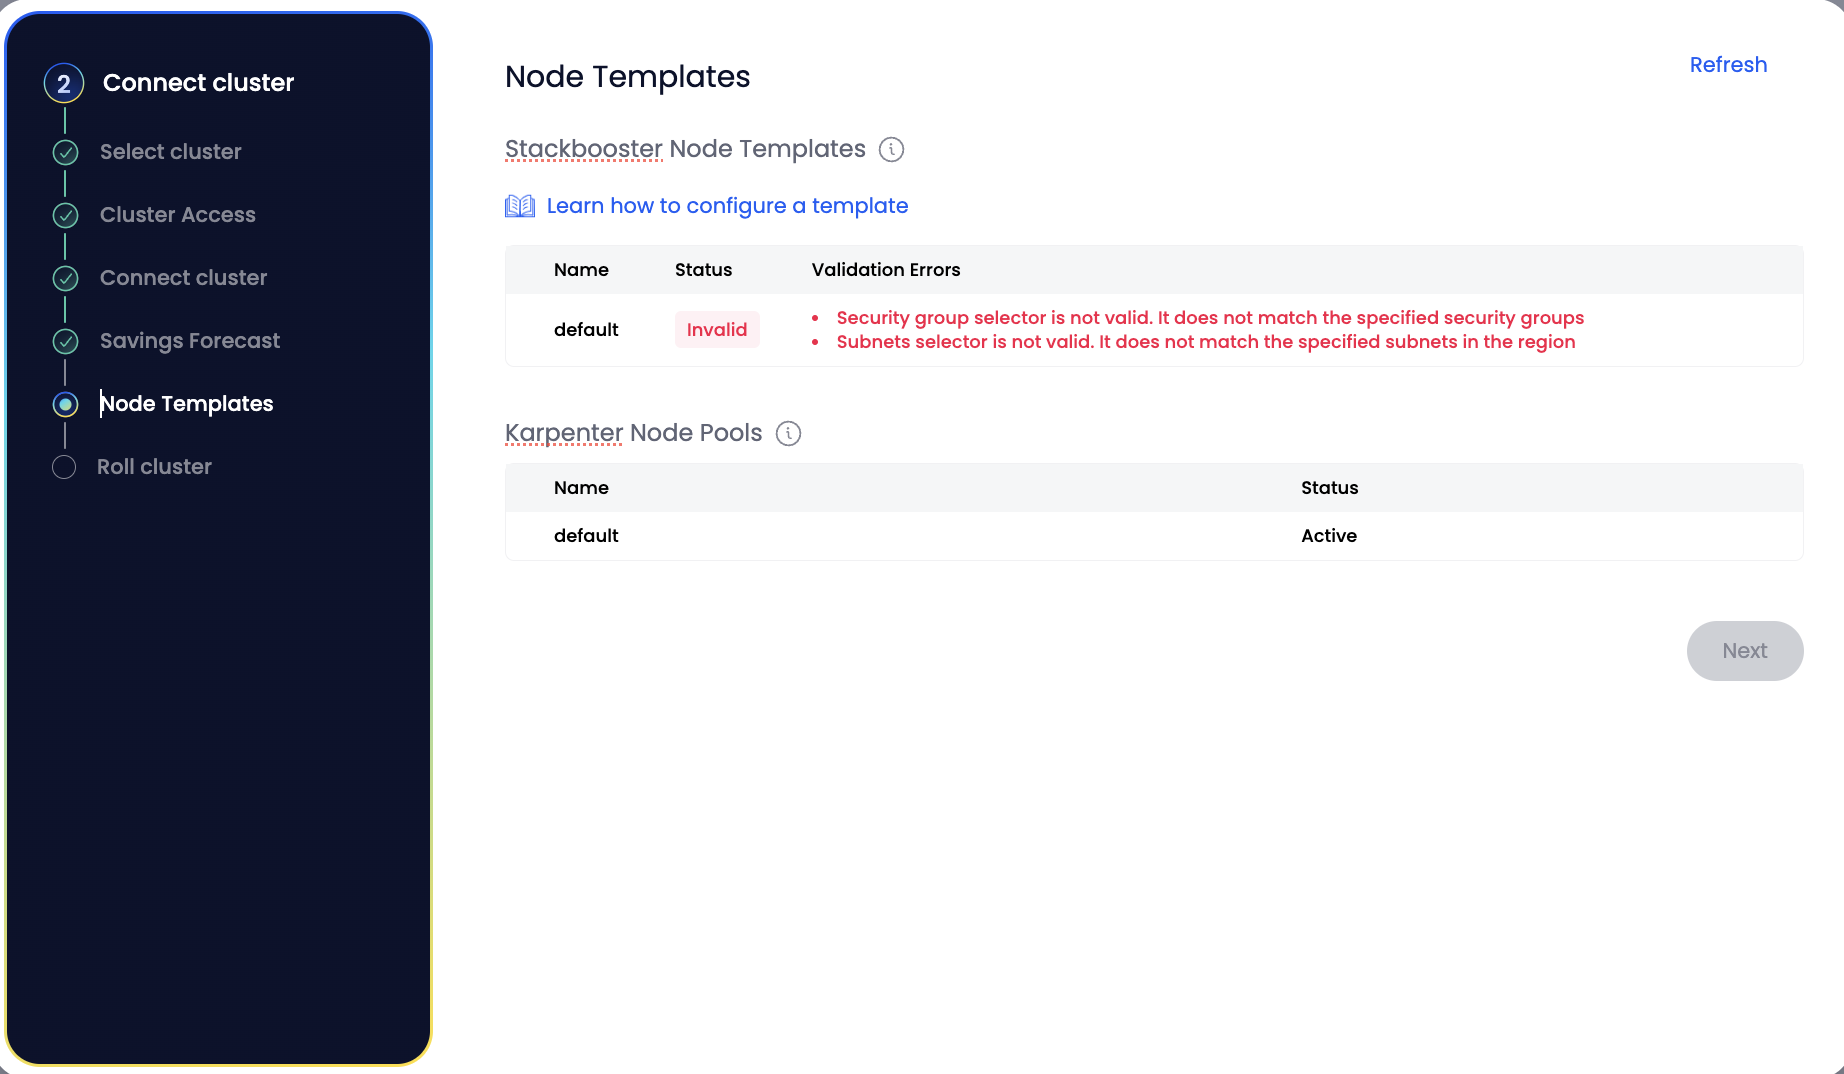
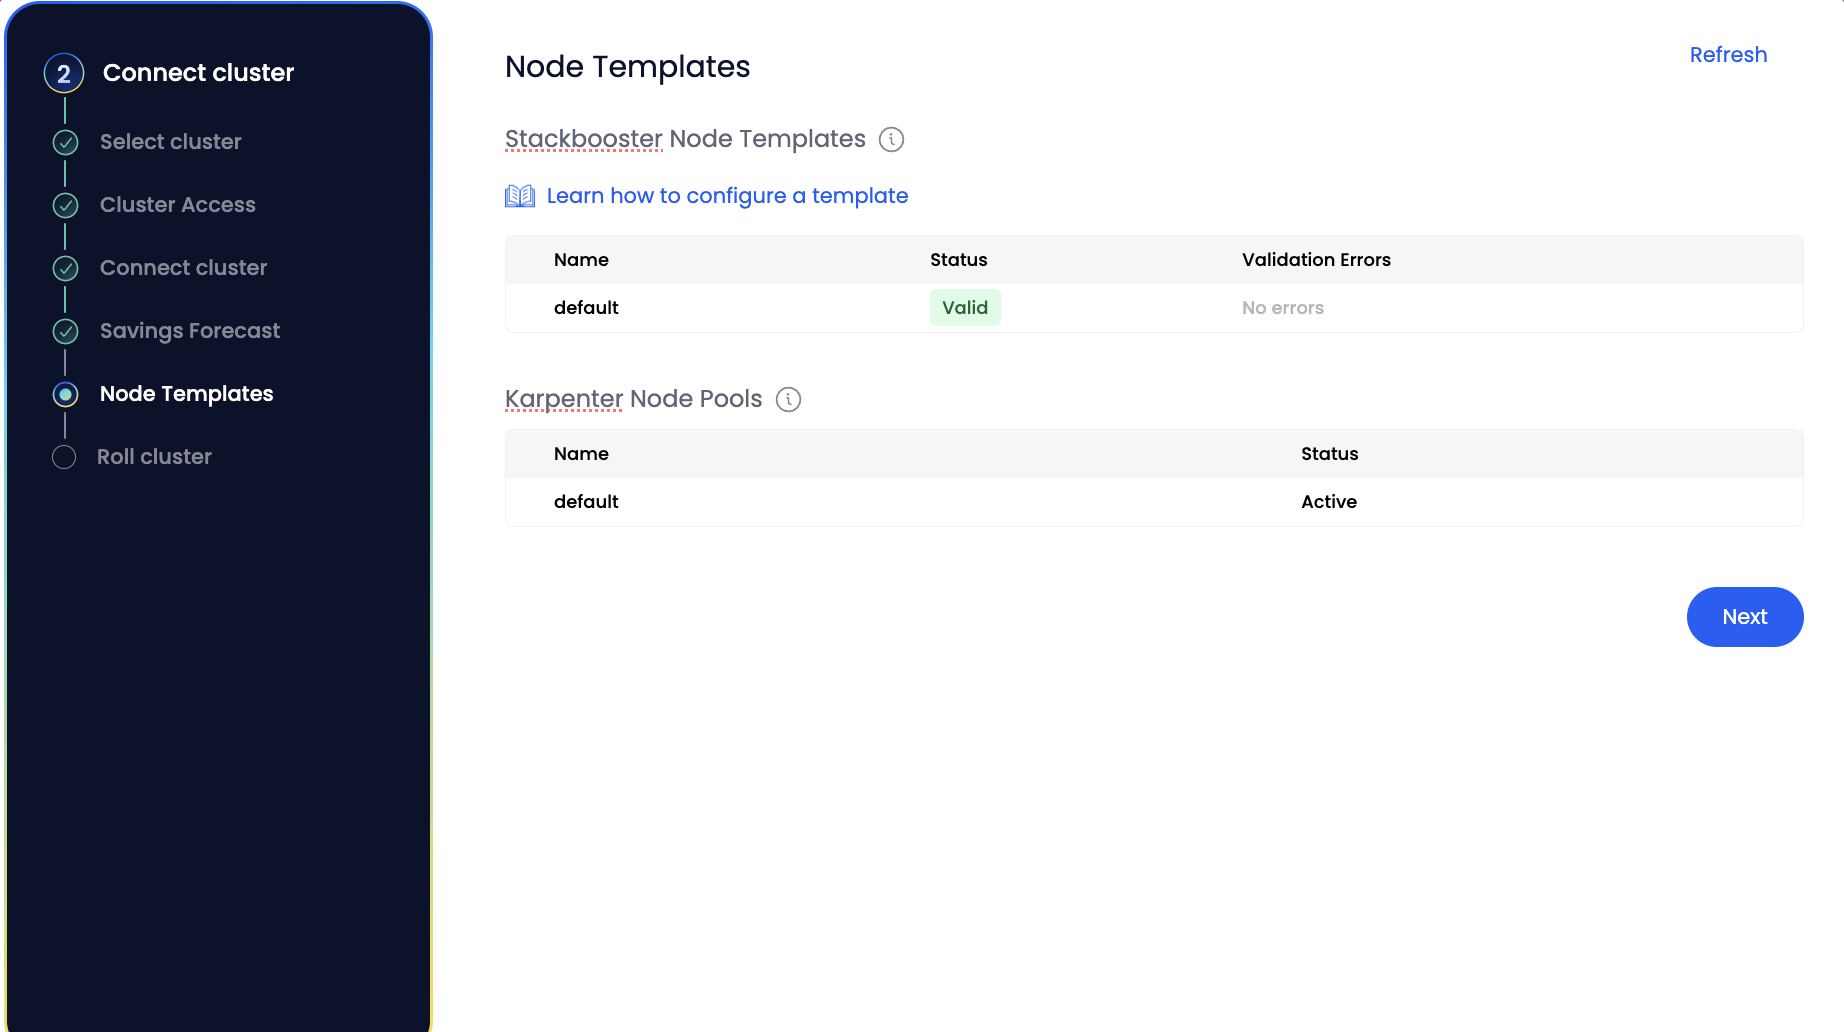
Step 4: Configure Node Templates #
Node Templates define the characteristics of the nodes Stackbooster can provision. These include instance types, zones, lifecycle (Spot/OD), resource capacity, and scheduling rules.
- The platform automatically validates your Node Templates and checks whether existing workloads can be scheduled using them.
- If any workloads do not match the configured templates (due to affinity, resource requests, or taints), the system will block the roll and prompt you to fix these issues.
This ensures that all applications remain schedulable during and after the migration.
Automatic Migration from Existing Configurations #
Stackbooster supports convenient migration paths for clusters currently managed by other provisioning systems:
Karpenter:
Stackbooster provides a one-click conversion of your Karpenter configuration into Stackbooster Node Templates. If Karpenter is detected, Stackbooster will automatically scale its Deployment to 0 during the roll process to prevent scheduling conflicts.Cluster Autoscaler:
If your cluster uses classic autoscaling groups, Stackbooster will parse existing configurations and offer to create Node Templates based on the discovered settings.
⚠️ This functionality is currently in beta.
📦 Reliability During Cluster Transition #
When transitioning a cluster to full Stackbooster management, defragmentation logic is used under the hood to safely replace unmanaged nodes with optimized ones. This transition is governed by a robust reliability model shared with Stackbooster’s Defragmentation mechanism:
- ✅ Batched processing ensures new nodes are provisioned and ready before old ones are drained.
- ✅ Pod Disruption Budgets (PDBs) are fully respected to prevent service impact.
- ✅ Workload safety checks (e.g. local storage usage, unmanaged pods) guarantee that only reschedulable pods are migrated.
- ✅ Timeouts and draining rules are observed to allow for graceful pod eviction.
Stackbooster applies these mechanisms automatically during the cluster roll. For a detailed description of the rollout process and safety guarantees, refer to the Cluster Defragmentation documentation