Guide for Node Template (Group) Creation/Edition #
A Node Template defines the configuration for worker nodes in your Kubernetes cluster. This guide walks you through creating and configuring node templates to meet your workload requirements.
Overview #
Node Templates allow you to standardize node configurations across your cluster, including:
- EC2 instance specifications and lifecycle management
- Networking and security settings
- Kubernetes-specific configurations like taints and labels
- Storage and access configurations
Getting Started #
Prerequisites #
Before creating a node template, ensure you have:
- An active Kubernetes cluster
- IAM instance profile with worker node permissions
- Configured VPC with subnets and security groups
- Appropriate permissions to create and manage node templates
Basic Workflow #
- Navigate to the Node Template Editor
- Configure basic information and scheduling
- Set core AWS infrastructure settings
- Configure instance specifications
- Apply advanced settings as needed
- Review the generated YAML
- Save your template
Configuration Sections #
Basic Information & Pod Scheduling #
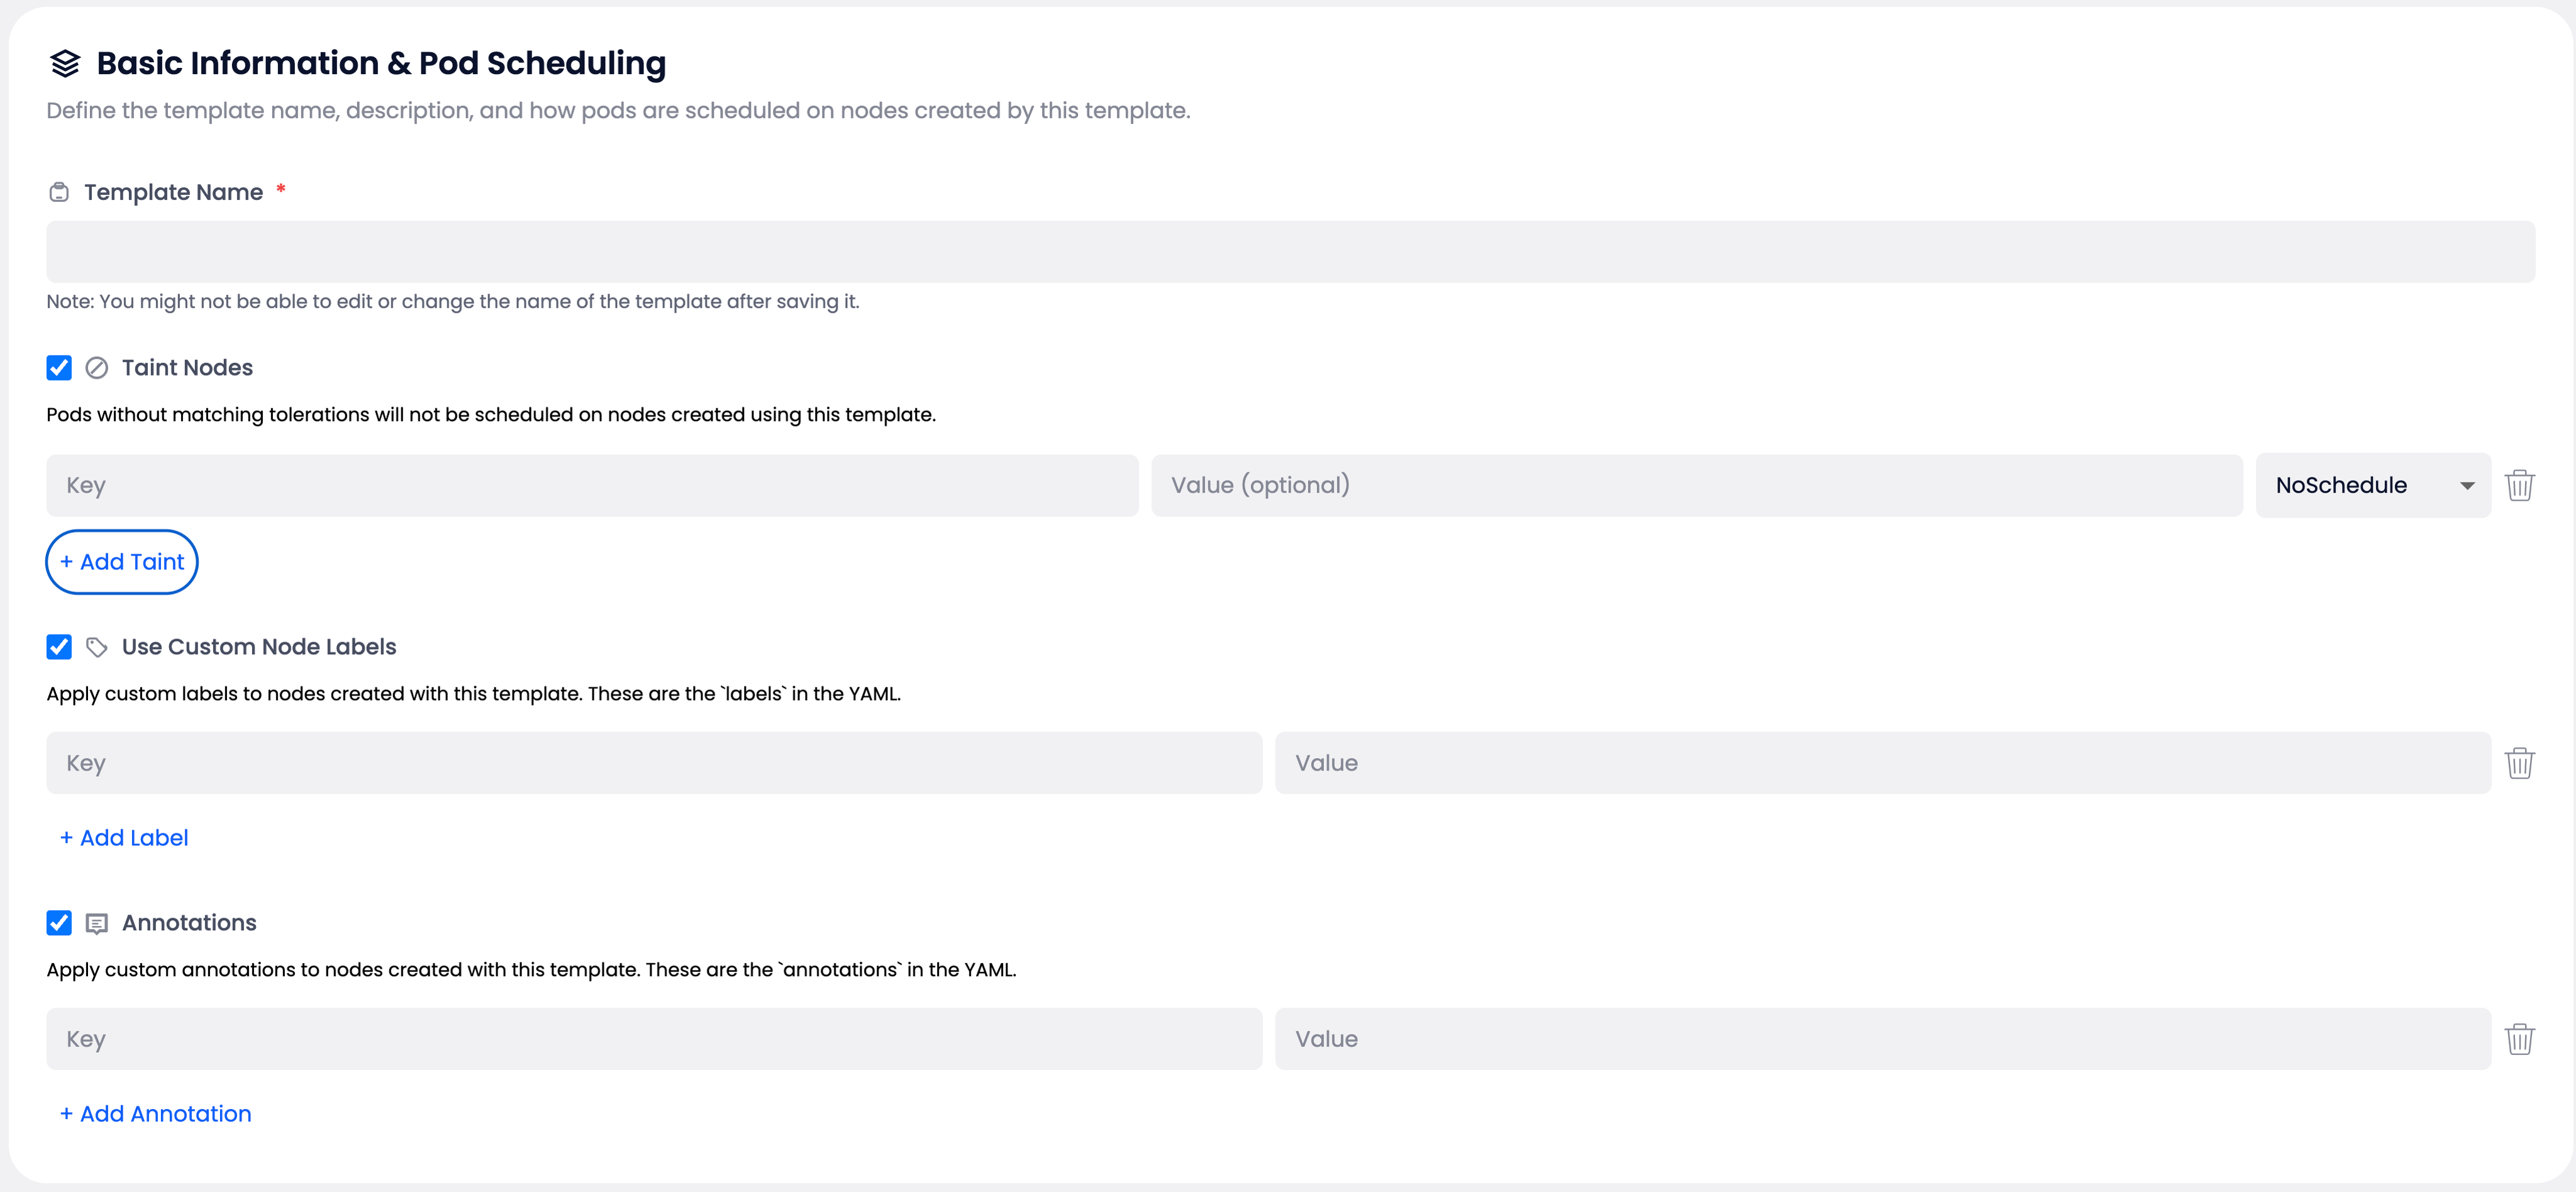
Template Name #
- Required: Must be unique within your cluster namespace
- Format: DNS-1123 compliant (
^[a-z0-9]([-a-z0-9]*[a-z0-9])?$) - Length: 1-63 characters
- Note: Template name becomes immutable after first save
Node Taints #
Taints prevent pods from being scheduled on nodes unless they have matching tolerations.
Configuration:
- Key: Required, must be a valid Kubernetes label key
- Value: Optional
- Effect: Required, choose from:
NoSchedule: Prevents new pods from being scheduledPreferNoSchedule: Tries to avoid scheduling podsNoExecute: Evicts existing pods and prevents new ones
Best Practices:
- Use taints for dedicated node pools (GPU nodes, high-memory workloads)
- Avoid duplicate (key, effect) pairs
- Consider using descriptive keys like
workload-typeornode-role
Custom Node Labels #
Labels help identify and select nodes for pod scheduling.
Configuration:
- Format:
key=valuepairs - Key Requirements: Valid Kubernetes label keys, up to 63 characters
- Value Requirements: Up to 63 characters
- Reserved Prefixes: Avoid
kubernetes.io/*andnode.kubernetes.io/*
Example Labels:
environment=production
team=data-science
gpu-type=v100
Annotations #
Annotations store additional metadata that doesn’t affect scheduling.
Configuration:
- Format:
key=valuepairs - Key Requirements: Valid Kubernetes annotation keys
- Value Requirements: Up to 256 characters
- Use Cases: Monitoring configuration, deployment information, contact details
Core Configuration #
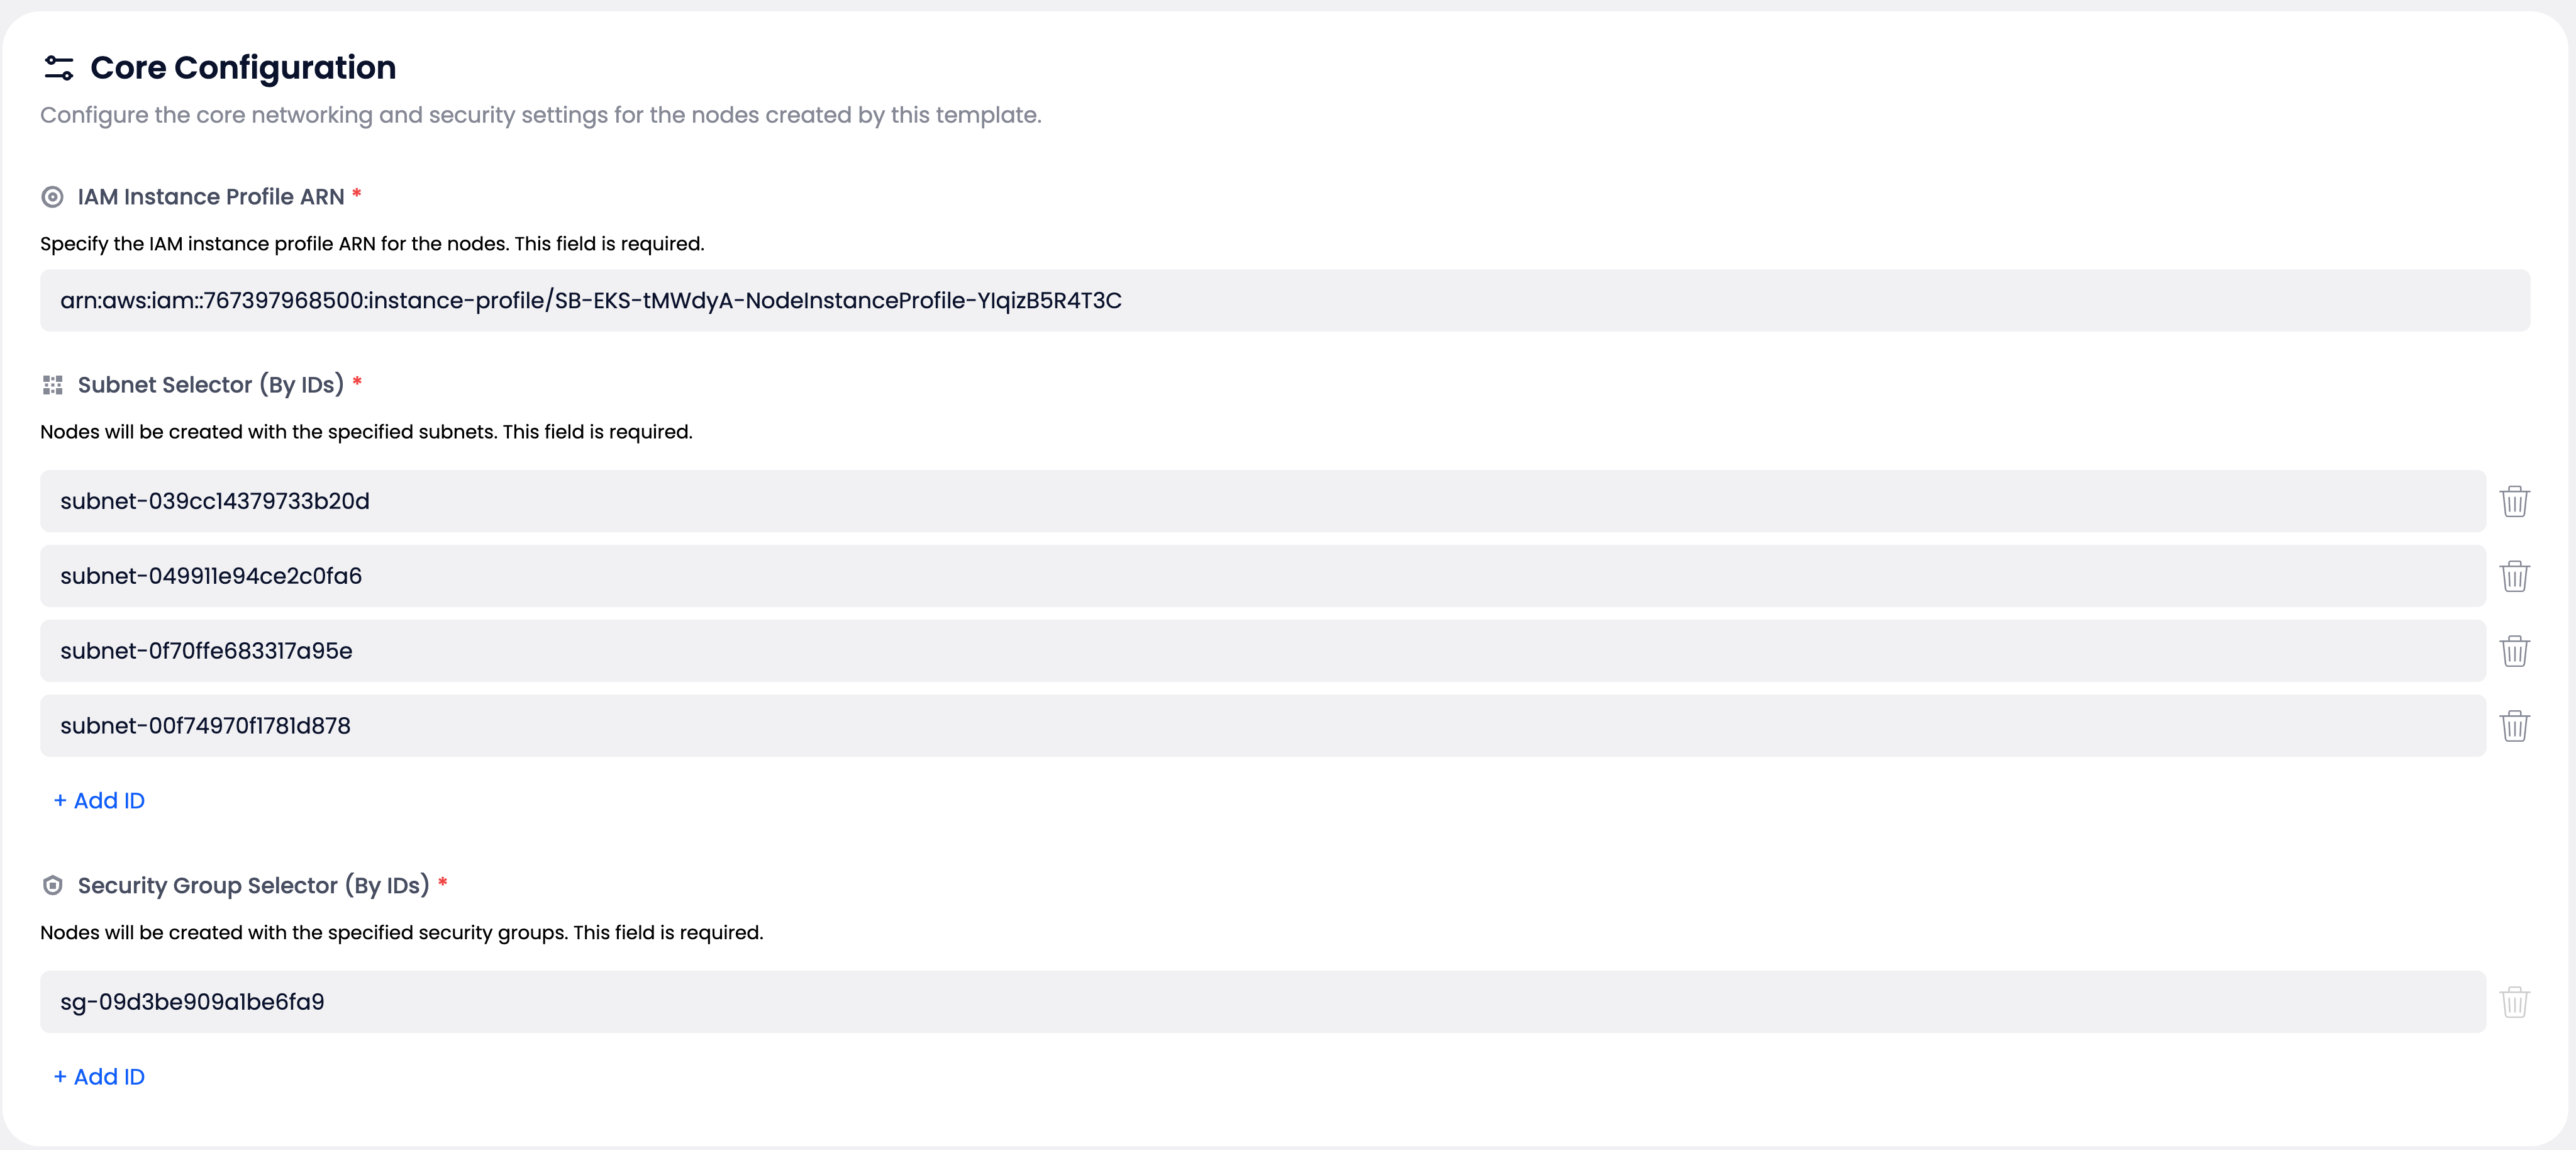
IAM Instance Profile ARN #
- Required: Must exist in your integrated AWS account
- Permissions: Must include worker node permissions for EKS
- Format: Full ARN of the instance profile
Subnet Selection #
Configure which subnets your nodes will be deployed to.
Requirements:
- Minimum: 1 subnet required
- Location: All subnets must be in the cluster’s VPC and region
- Recommendations:
- Use subnets across multiple Availability Zones for high availability
- Consider private subnets for security
Validation:
- Warning if all subnets are in a single AZ
- Error if any subnet is outside the cluster VPC
Security Groups #
Define network access rules for your nodes.
Requirements:
- Minimum: 1 security group required
- Location: Must be from the same VPC as the cluster
- Recommendations: Include the cluster’s recommended node security group
Instance Configuration #

AMI Family #
Choose the Amazon Machine Image family for your nodes.
Options:
- AL2: Amazon Linux 2 (stable, widely tested)
- AL2023: Amazon Linux 2023 (latest features, optimized performance)
Compatibility: Automatically validated against your cluster’s Kubernetes version
Instance Lifecycle #
Control how your instances are provisioned and managed.
Options:
- Spot with On-Demand Fallback (
spot-od): Default, tries Spot instances first - On-Demand Only (
od): Guaranteed capacity, higher cost - Spot Only (
spot): Cost-optimized, scale-up may fail if no capacity
Capacity Planning:
- Use
spot-odfor most workloads - Use
odfor critical, always-available services - Use
spotfor batch processing and cost-sensitive workloads
Allowed Machine Types #
Specify which EC2 instance types can be used.
Configuration:
- Format: Comma-separated list (e.g.,
c6a.large,m5.xlarge,r5.2xlarge) - Validation: Types are checked against AMI architecture and region availability
- Integration: Must align with any instance-type node restrictions
Selection Tips:
- Consider your workload’s CPU, memory, and network requirements
- Include multiple types for better Spot instance availability
- Balance cost and performance needs
Advanced Configuration #

SSH Access #
Configure SSH key access for node troubleshooting.
Configuration:
- Optional: SSH key name from your AWS account/region
- Security Warning: Production hardening warning displayed when enabled
- Use Cases: Debugging, maintenance, custom software installation
Block Device Mappings #
Configure storage for your nodes.
Default Configuration:
- Root Device:
/dev/xvda - Size: 20 GiB (configurable 20-1024 GiB)
- Type:
gp3(orgp2for legacy) - Encryption: Per organization policy
- Delete on Termination: Enabled
Additional Devices:
- Add extra storage as needed
- Configure encryption and KMS keys
- Consider workload storage requirements
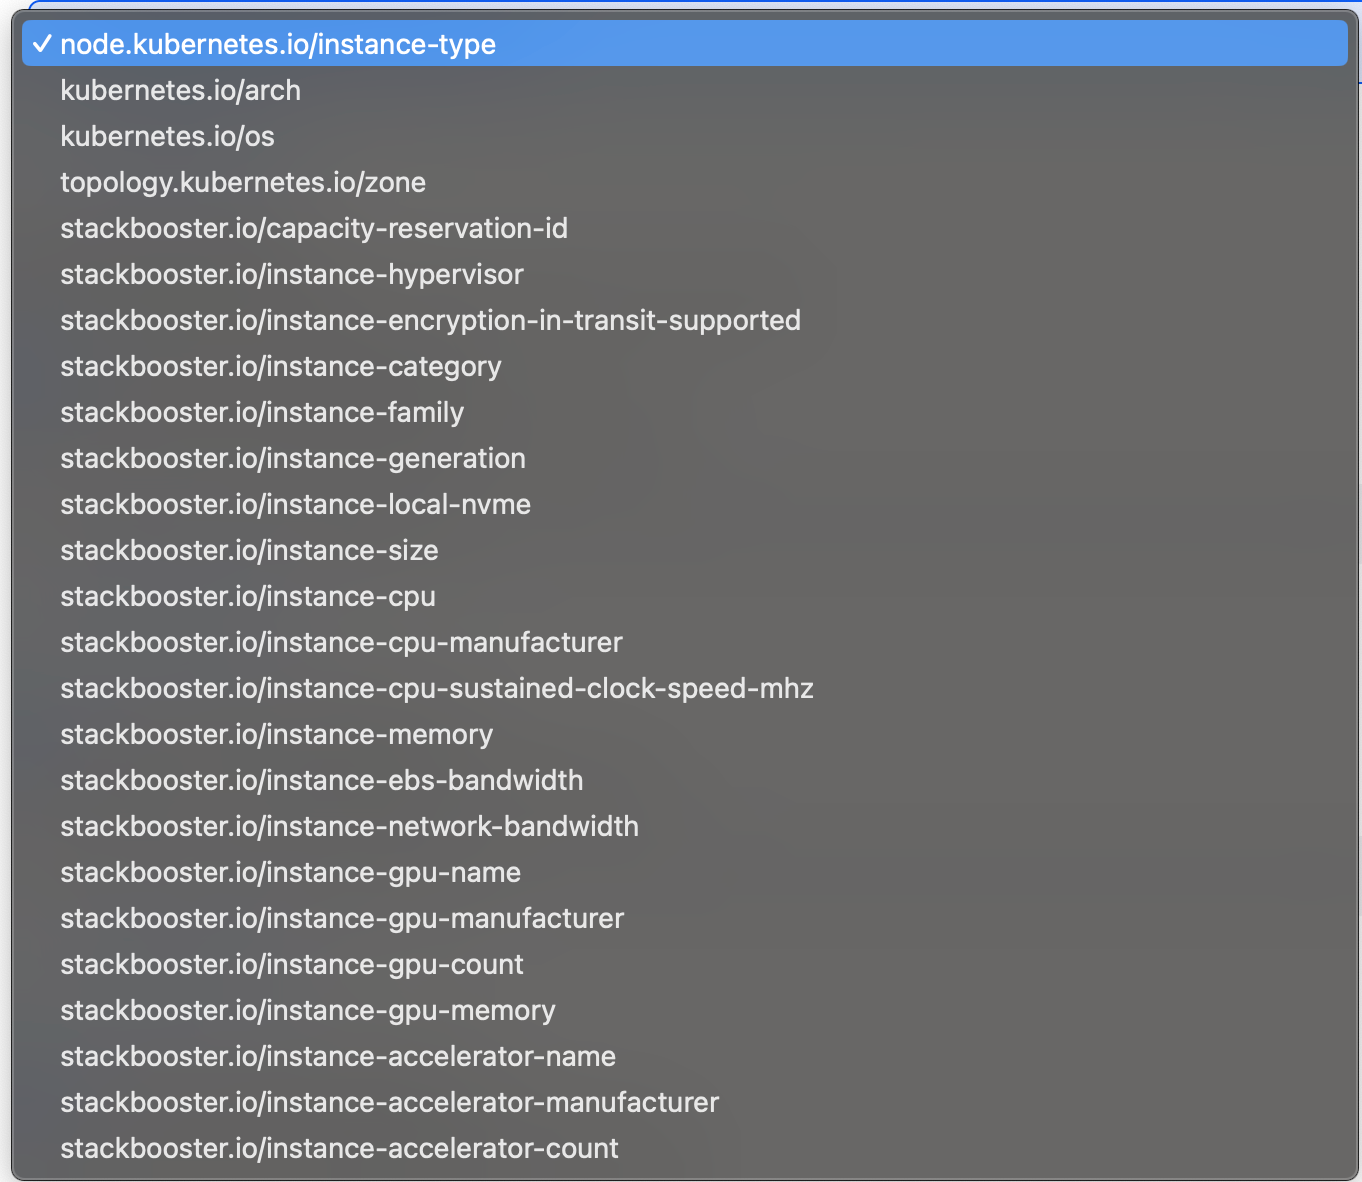
Node Restrictions #
Control pod placement using node selectors.
Standard Restriction Keys:
node.kubernetes.io/instance-typekubernetes.io/archkubernetes.io/ostopology.kubernetes.io/zone
Extended Keys (platform-specific):
stackbooster.io/instance-familystackbooster.io/instance-generationstackbooster.io/instance-cpustackbooster.io/instance-memorystackbooster.io/instance-gpu-name
Operators:
- In: Pod must match one of the specified values
- NotIn: Pod must not match any of the specified values
Validation Rules:
- Zone values must match selected subnet AZs
- Instance-type restrictions must be within allowed machine types
- No empty value lists or contradictory duplicates
Kubelet Parameters #
Fine-tune Kubernetes node behavior.
Eviction Policies: Configure when pods are evicted due to resource pressure.
Hard Eviction:
- Format:
key=valuepairs - Example:
memory.available=100Mi,nodefs.available=10% - Behavior: Immediate pod eviction when threshold reached
Soft Eviction:
- Format:
key=valuepairs - Behavior: Gradual eviction with grace period
- Grace Periods: Define with
key=durationformat (e.g.,memory.available=90s)
Supported Signals:
memory.available: Available memorynodefs.available: Available disk space on root filesystemimagefs.available: Available disk space for container imagespid.available: Available process IDs
Value Formats:
- Memory:
Mi(mebibytes),Gi(gibibytes) - Disk:
%(percentage),Mi,Gi - Duration:
s(seconds),m(minutes),h(hours)
Precedence: Hard eviction settings override soft eviction for the same resource
Generated YAML Preview #
The editor provides a real-time YAML preview that mirrors your configuration exactly. This includes all Kubernetes-standard fields and platform-specific extensions.
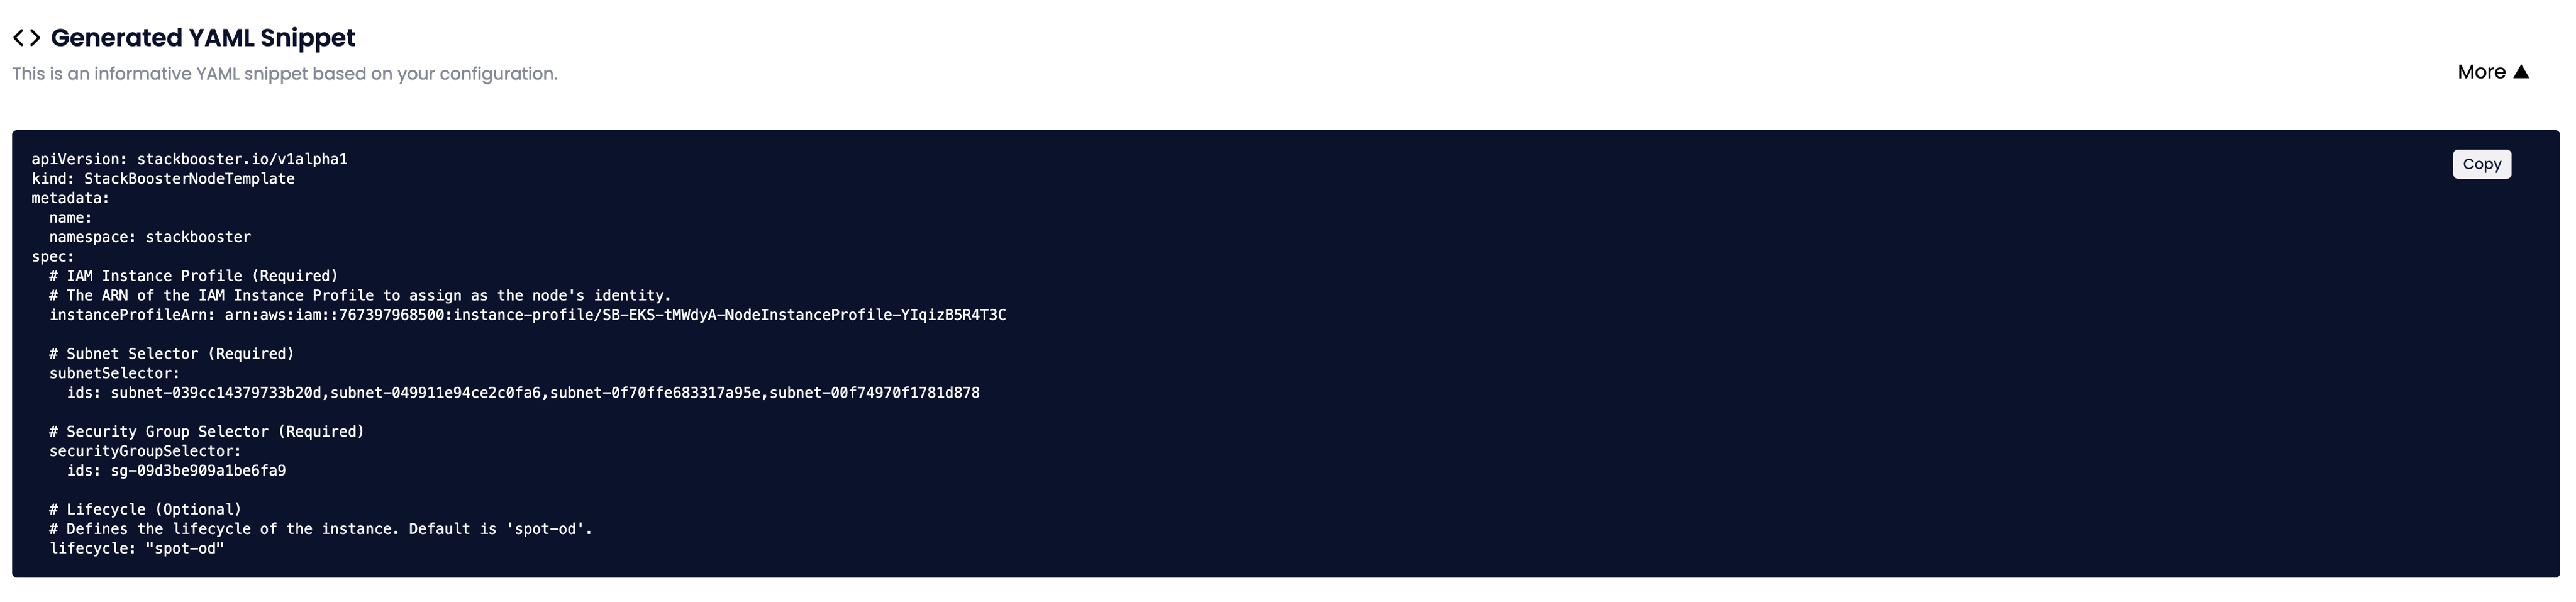
Key YAML Sections #
- Metadata: Template name, namespace, labels
- Instance Profile: AWS IAM configuration
- Networking: Subnet and security group selectors
- Compute: Instance types, lifecycle, AMI family
- Storage: Block device mappings
- Kubernetes: Labels, annotations, taints, kubelet settings
- Restrictions: Node selector requirements
Copy Functionality #
Use the Copy button to copy the generated YAML to your clipboard for:
- Version control tracking
- Infrastructure as Code workflows
- Manual kubectl applications
- Template sharing and review
Validation and Error Handling #
Real-time Validation #
- Inline Validation: Fields are validated as you type
- Save Prevention: Save button remains disabled until all required fields are valid
- Cross-field Validation: Related fields are checked for consistency
Common Validation Errors #
Infrastructure Mismatches:
- Subnets or security groups from wrong VPC/region
- AMI family incompatible with Kubernetes version
- Instance types not available in selected regions
Configuration Conflicts:
- Allowed machine types don’t match instance-type restrictions
- Zone restrictions don’t match selected subnets
- Contradictory node selector requirements
Capacity Warnings:
- All subnets in single availability zone
- Overly narrow constraints with Spot instances
- Missing cluster-recommended security groups
Best Practices #
Security #
- Use private subnets when possible
- Include cluster-recommended security groups
- Enable encryption for block devices
- Avoid SSH access in production environments
- Use IAM roles with minimal required permissions
Reliability #
- Distribute nodes across multiple AZs
- Use mixed instance lifecycle (
spot-od) for resilience - Configure appropriate eviction thresholds
- Monitor capacity warnings before saving
Cost Optimization #
- Leverage Spot instances for non-critical workloads
- Right-size instance types for workload requirements
- Use appropriate storage types (gp3 vs gp2)
- Implement node restrictions to optimize scheduling
Maintainability #
- Use descriptive template names and labels
- Document purpose with annotations
- Standardize taints across similar node pools
- Version control your template configurations
Troubleshooting #
Common Issues #
Template Save Failures:
- Check all required fields are completed
- Verify infrastructure resources belong to correct VPC/region
- Ensure AMI family is compatible with cluster version
- Review validation error summary
Node Scheduling Problems:
- Verify pod tolerations match node taints
- Check node selector requirements align with restrictions
- Confirm resource requests are within node capacity
- Review eviction policy settings
Capacity Issues:
- Broaden instance type selections
- Increase subnet/zone coverage
- Consider mixed lifecycle policies
- Monitor AWS service limits
Getting Help #
- Review the generated YAML for configuration details
- Check cluster compatibility matrices for version support
- Consult AWS documentation for instance type specifications
- Use platform monitoring tools to track node performance
Remember that node templates provide the foundation for your cluster’s compute capacity. Take time to understand your workload requirements and configure templates that balance performance, cost, and reliability for your specific use cases.